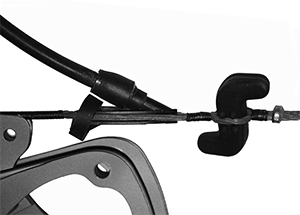
ANY hand shock can be eliminated by adjusting the synchronization. Very easy process, all you need is allen key and pliers. Takes 15 minutes. Only need to adjust top cam. 1) Shoot bow and take note of the hand shock. 2) Mark with Sharpie the cable end directly below the set screw as show by the photo 1 to the below. 3) Loosen set screws with long end of Allen-Key as shown in photo 2 lower right. Using the short end of the Allen-Key may strip set screw. If you strip the set screw use larger 4-40X1/8" no tapping is needed. 4) Turn with pliers (Photo 3) both cable ends to the right about 1/8 turn. Turn both equally so the marks are on the right hand side as show in photo 4. 5) Tighten set scews and shoot bow again. 6) If hand shock is gone, you are done. If hand shock is greater Repeat step 3 & 4, but this time turn both to the left. 7) You can use the sensitivity of you hand to feel which way to turn and the amount to turn the cable ends to totally eliminate the shock.. |
PEEP & SIMS ASSEMBLY
Pick the desired peep size
(small, medium, or large,
start with medium)
and install as shown.
Place the rubber protection
ring around peep
before shooting.
The peep stem must be pointed up or slightly left
(keeps rubber tube from getting into cam when peep is mounted within
2 inches of cam). Attach other end of rubber tubing to cable on the
upper right, 3-4” below cable head (See Stem Position right). The
optional upper string Sims (noise abatement) is mounted below peep
with one speed nock below it.
Note: If you prefer using your string for self-aligning the peep, cut peep stem off and
eliminate the rubber tube.
ARROW RESTS
The Hostage and Whisker Biscuit arrow rests work great with this bow due to their full
containment and light weight characteristics. Fall-a-ways are heavy and may
unbalance the cables but can be used. Strongly suggest you try the recommended
rests.
SIGHT MOUNTING
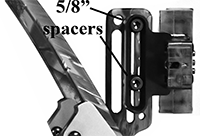
Two 5/8 inch spacers (plus screws) are supplied
to mount the bow sight as shown.
OTHER SIGHTS
Other sights can be used but they have 3 disadvantages:
1) They have a 3.5” extension bar and heavy clamps on
each end. The result is a heavy sight and the light weight Liberty I sight bracket design
is wasted.
2) The 3.5” extension increases the possibility of sight bar fracture if dropped from stand.
3) The 3.5” extension makes the bow unable to fit into the Liberty bow case.
STRING LOOP is a must. Do not move.
STABILIZER Sims Mini S coil is the best if you really need one.
RELEASE Use only caliper (both jaws open) type releases like
T.R.U. Ball Copperhead Xtra. The release is short and helps the
longer draw needed due to the string angle (especially for those
who touch the string to their nose). The 1/2-3/4 inch longer draw
increases your arrow speed.
SETTING PEAK WEIGHT
One full 360 degree turn equals 4-5 lbs. Mark screw so that you
turn both sides equally. Turn one-half turn on each side at a time.
Do not turn more than 2.5 turns to get 10 lb draw weight reduction.
All bows and this bow perform best at peak weight.
MUST READ MANUAL
PEEP, SIGHT, and TORQUE are the main
ITEMS THAT ARE DIFFERENT, SO READ THIS.
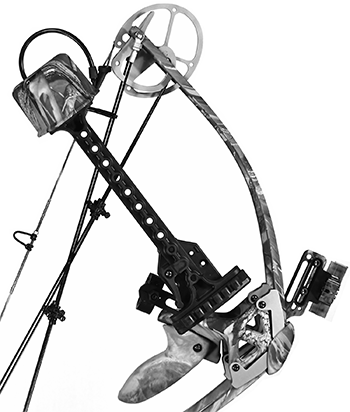
1. Peep sight must be installed upside down. See inside page picture. Failure to do so
causes rubber tube to sometimes (rarely) interfere with cam and string. Cut rubber tube
shorter to make peep turn completely. Secure (tie it in as shown NOTE: it is different from
other bows) peep after positioning.
Peep tube should be attached 3-4 inches below cable head.
Bow Jaxs must not touch cable stop.
2. Drawing with fingers results in very painful finger pinch (due to the string angle)
and may cause a high torque let-down or dry fire.
3. A zero torque position is achieved by centering
the cables between the limbs
(See Full Draw Picture right).
Use loosely held high wrist position.
Test for torque by shooting through paper
(paper mounted on open frame) see #4.
4. Side paper tears are caused by hand torque,
by low wrist, by low
arrow spine, by to short of peep tube,
or by side off hook type of
release (use caliper type release).
Purposely torque bow to get
opposite tear, note cable and limb
position in getting the opposite tear.
5. The loop is dead center, secured by speed nock.
Do Not Move!
Do not install metal string loops, they catch in cables and Bow-Jaxs.
A replaced loop or string will result in a un-centered loop requiring fine
sync adjustment (to eliminate hand shock). If you want to try to improve
on the factory sync, see back page of these instructions.
6. If you use a Whisker Biscuit (the one bought with the bow) make sure that the
arrow diameter is 19XX (.297) or smaller. Hostage rest has no restrictions.
7. Heavy spine arrows are required. 15+ lbs (point weight dependant) above bow
or 10 lb above bow for Carbon Revolution Arrows. Example, a 60 lb bow should
use arrows spined for a 75 lb bow. Arrow fletching should be no higher than 1/2
inch. We lowered minimum arrow weight to 4.0 gr/lb, 70 lb bow is 280
grains and 60 lb is 240 grains.
8. Cam synchronization: See instructions below.
Note: Bow can be restrung using a old long string and the string changer.
| Note: Tuning or adjustment to your new bow should not be needed. It may be many years before you need to change the string and at that time you may need to re-sync the bow as shown below. Many archers like to tinker with their new bow and it is possible to improve on the factory set synchronization (See below). |
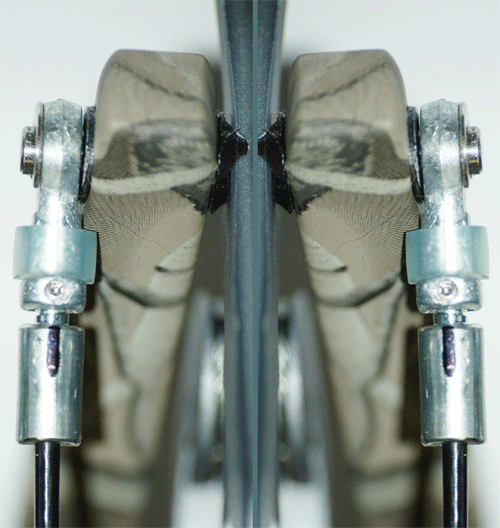

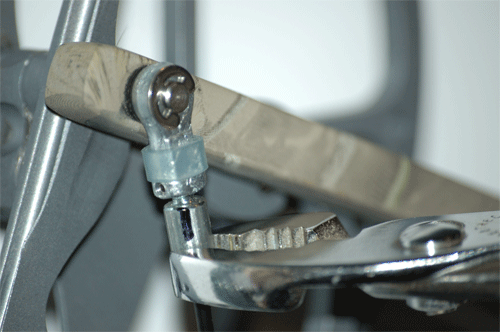
Photo 3
Photo 2
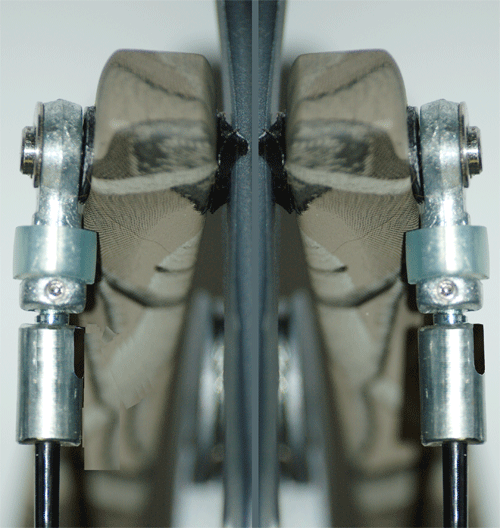
Photo 4
| The Liberty bow is very stable (due to the steel cables) The factory settings should hold for the life of the bow. Changing the string and putting on a new string loop may slightly de-sync bow if the new loop is not centered. Minor Re-Syncing is an easy procedure, which is done with nothing more than a Allen-Key and pliers. |
QUIVER MOUNTING
Pictured is the removable Alpine Bear Claw.
Many mounting angles are possible, long arrows use the greatest
angle to reduce the “through the brush” profile. Others, to keep
the bow light, use the CatQuiver (back quiver) and hang the bow
on the quiver.
CABLE SILENCERS
Many testers said that the bow is quiet without
the Bow-Jaxs, but if you want to see how quiet a bow can get, install them.
Silver marks are provided as position markers. Just cover the silver mark
as you go toward the cam. They mount 1/16” from the cam at full draw.
Use two cable ties per Jax as shown, tighten hard and then clip off the ends.
Note: Limb Sims have no effect.
PEEP SIGHT ADJUSTMENT
Flipping the peep, or switching peep size, is best done (with assistant) at
full draw (there is only 10 lbs of tension). Use a dull pointed tool of any sort.
The rubber ring goes back around the peep as shown on opposite page.
Shoot a few times to get the peep in the right spot and then tie it in. Put
10-15 wraps around the string at the bottom of the peep, then up around
the peep stem, back down for a few knots, up around the stem again, and
then finish with 5 wraps at the bottom with knots. There is no need to tie
above the peep when the rubber ring is around the peep.
CHANGING STRING
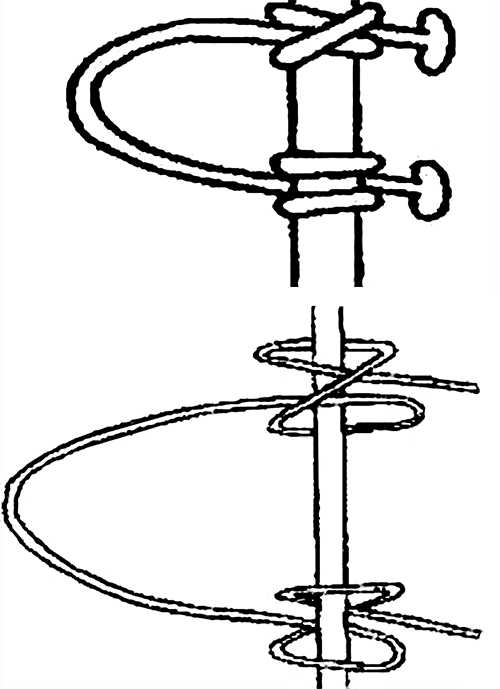
With 2 people you can change the string.
One to bring the bow to full draw and the other to tie or hook (then tighten)
the cams together as show on the right. MUST BE VERY TIGHT.


Goal is 60+ years bow
longevity
We have one customer
that shoots 200 shots a day
and has been doing that
since May of 2005. So if
we take time out for
vacations etc we estimate
he has shot the Liberty I
bow about 300,000 times
on the old cables. Now,
the new cables with the
speed nock, improve on
the old cables by 70%.
You can see that with the
speed nocks attached the
cable the cable can’t bend
easily and the speed nock's
plastic cushion softens the
bend.

Non Liberty Sights
The Liberty bow riser has the sight bar extension built-in. When you use other sights (all
have a 3.5” extension and heavy mounting hardware on both ends). What you have in
essence is two extension bars which increases risk of damage to riser and sight.
Also, sight must be taken off to fit in case.
The New 3 pin Sight has 7” of fiber attached to a glow ring (2 pins .019, other .029).
Arrow Rests
Most other full containment rests work. We chose the Hostage and Whisker Biscuit
because they are light and accurate. Full containment rests are recommended because of
the high let-off. The arrow rest is set from the factory and should not adjusted for the life
of the bow. Adjustable arrow rests add needless weight.
Keep it Light
With Liberty Sight and Hostage or Whisker Biscuit bow weight goes from 2.3 lbs to 2.52
lbs. Same goes for quivers and stablizers on the bow. You should not need a stablizer and
get a quiver to carry the bow on.

Tie D-Loop

PROPER HAND POSITION
(Bow is tuned at factory no tuning needed)
Hi Howard,
I am having a problem tuning my bow. I am getting right tares and
can’t seem to correct-it I tried stiffer arrows and softer spine arrows.
I tried different grain points. My string-loop is dead center as well
as my arrow rest. My timing seems to be dead on. I have tuned a
lot of bow but this little guy has me stumped. Can you give me any
other suggestions please. Buy the way the bow is still awesome and
I get a lot of comments and-laughs until they see me shoot it. They
just can’t believe what they are seeing. You-should start getting
more orders from around me area because the guys love it. Thanks
Chad Reed
Chad ,
Try a different release, Due to the low holding weight a release that
sildes off a lever throws arrows sideways. Use Caliper type release.
Twist the bow so you get a left tear. Item #4 on the instruction.
sheet. Note where the-cables are in relation to the limbs at full
draw, Twist wrist to get left tear and then right tear. Use this
experience to shoot a bullet hole (Cables aligned/centered between
limbs). Do not adjust arrow rest off of center as set by factory.
Hi Howard,
Hey Thanks for the advise. That is what I was doing, when I drew
back I was torqing the bow. Now that I found my proper hand position
the little sweet heart shoots bullet holes. Bow is the best. Thanks for
your time. Chad Reed
Torque is aimed (centered) out of your shot.
Photo 1
| POUNDAGE ADJUSTMENT Best to leave as set, bow works best at peak poundage. Max adjustment 2.5 turns counterclockwise |